When I eventually tracked down a breeder it seemed obvious that I´d have to buy and breed my own worms or drive for 2 hours to buy some worm poop also known as worm castings every time I wanted some.
My guys were intrigued; we were going on a picnic adventure to buy worms! But not just any worms what I needed were the smallish red worms that are found in compost heaps, the Eiseia fetida also called red wigglers, manure or tiger worms.
These worms turn food waste into a rich organic natural fertilizer quickly by eating decaying material which becomes the best poo ever – a lovely organically rich material that helps restore the soil with vital nutrients and fertilizes the plants helping them grow stronger deeper root systems which in turn helps them to be tougher and more drought resistant.
What more did I need than a load of worms and kitchen waste. The waste I had, everything the dog didn´t eat except onion skins and citrus fruit went into the worm bag. I used a big builders´ bag, the type they use for sand delivery but I also made a couple of worm nurseries for the boys. I used two washing-up bowls, one for each son, with some holes in the bottom and put them outside in the garden on some stones for drainage. I put a some of my purchase, worm egg capsules as well as worms into the freshly prepared bedding so the guys could observe them more easily, watch them whenever they wanted and be responsible for their own worm bin.
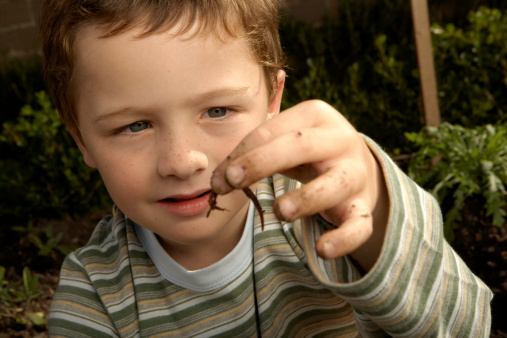
The eggs are like tiny yellowish capsules and when the baby worms hatch they are white for the first few days of their lives, the boys were enthralled. I´d find them rooting in their ´bin´ to find the newly hatched worms and to see how many egg capsules they could find.
Worms breed very quickly if the conditions and the supply of food is right, one worm can produce nine babies a week in an ideal world – imagine if we could!
I´m still using the same builders´ bag, it´s lasted seven years and cost very little to buy, it´s certainly getting past its best. I no longer have the nursery bins as my guys are no longer into playing with worms – though I still haven´t grown out of it.
The same lot of worms I bought just go on reproducing, being given to local lads for their fishing trips, fertilizing my garden, filling my pots for house plants and providing unending entertainment for my new puppy to root about in.
Once I saw the reduction in rubbish and realized I was making less trips up to the bins with leaky dripping rubbish bags, I was well and truly hooked. This was recycling just about everything. Meat bits and bones went to the dog and all other veggie matter to the worms, until we got some greedy hens then they had to share! But the garden was growing so well there was plenty of pea pods, broad bean shells, lettuces and tomatoes to keep everyone and everything happy.
Vermiculture Composting
Vermiculture is the name given to the use of worms to produce compost/feritilizer through the digestion of food waste.
It produces a nutrient-rich material that supplies plants with nutrients to help them grow strong, healthy and drought and disease resistant is an easy way.
It saves water, energy, landfills, and helps to restructure the soil.
This way of producing a nutrient-rich reduces the need for synthetic fertilizers.
It completes the life cycle of plant produce naturally – rather than costly waste collection and the waste being buried – it´s nature´s method of recycling.
How the soil benefits from Vermiculture
Worm casts improve soil structure, texture, and help aerate the soil at the same time increasing its water-holding capacity. Plants when they get the vital nutrients they need grow stronger and develop deeper root systems for better drought tolerance and disease resistance.
Worms are necessary to help produce top soil and there are many different varieties of worms all with different functions, the red wiggler likes a dark, warm environment with plenty of food, its reproduction rate is proportionate witht the amount of food available so keeping them all together and constantly feeding them means a quicker turn round of available worm casts.
The worm cast also known as vermicompost provide a rich source of nutrients for plants and improves the texture and fertility of soil when its added. In this way we´re putting back in what the growing fruit and vegetables take out.
Vermicompost also adds beneficial microorganisms to the soil which help break down organic materials and convert nutrients into a more available food form for plants.
What to feed your worms
Most food scraps from the kitchen like fruit and vegetable peelings, lettuce leaves, banana skins, tea bags, coffee grounds, horse, chicken goat manure etc. – really anything except meat, onion and citrus.
Garden waste can also be given to them such as grass cuttings, weeds and leaves – just don´t add vast quantities at a time which can overheat or block out the oxygen supply.
Where to keep worms
Red Worms are surface worms and like to live in the top 30-40cm of the soil. They can be kept indoors in a closed but aerated container or outdoors. They can survive freezing winters and scorching summers although the dryness must be monitored.
They´re easy pets but need food, moisture, oxygen, and a dark place to live.
Almost any type of container can be used for housing worms as long as it has air holes and drainage holes, a shallow container is better but an old sink or wooden crate will do just as well.
Bringing worms home and after
Before you get them home make them a bed by shredding newspaper or cardboard into strips to fill your chosen container. Soak them and squeeze out any excess water.
Tip your worms onto their new bed, make sure it´s done in a bright place so they bury down into the bedding rather than crawl out.
Add a thin layer of sand or soil which they need for their digestion. Don´t add any food for a day or two.
Keep their bedding damp, but not too wet.
Harvesting your Poop
The easiest way to harvest your poop is outside in the daylight, cover your patio table with newspaper and tip the contents of your worm box out. The worms will immediately start diving for cover into the pile. Wait a few moments and when you can´t see any worms scrape away the top layer into your harvesting container.
Keep doing this, every time your scrape a layer away you´ll uncover some more worms, they´ll dive for cover and you get a new layer of worm compost to clear away – worm free.
When you´ve finished you´ll uncover a mass of wriggling worms ready to go back into their box and start the whole cycle of life process again.