By The Green Parent
13th November 2021
Babies need quality face-to-face interactions, time playing on the floor and opportunities to use their bodies and minds, but coming up with ways to play can feel daunting when you are tied up with nappies, feeding and nap schedules. I’ve been there! When my first child was a baby, I searched for play ideas on the Internet for hours, but I couldn’t find enough ideas that were engaging and safe to keep her occupied. I began Baby Play Hacks to share the baby play ideas I invented, to provide parents and caregivers with simple, engaging and inexpensive play ideas from birth through toddlerhood. Your home is a treasure trove of play elements, from recycled materials and craft supplies to socks and kitchen utensils.
Baby and toddler play can feel intimidating—babies and toddlers fall over frequently when learning to move, mouth objects and have short attention spans. Set up your environment for their success with the following suggestions.
CREATE A “YES SPACE”
Set aside a corner of your home—whether in your living room, a bedroom or playroom—that is safe for your child. This should be an area where you can say yes to anything they want to explore. Begin with a soft surface for play, like a water-resistant play mat or washable rug with a nonslip underlay. Section the area off and remove any loose cords, sharp or breakable objects or choking hazards.
INVITE PLAY
Your child’s play environment shapes their learning—a chaotic and unorganized play space can make focusing on one task challenging, and conditions without enough stimulation can lead to boredom. One way to set up your play space is to set out some small baskets or make room on a low bookshelf—but watch those corners!—and add a few toys at a time.
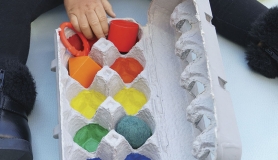
Rotate the toys, switching items out as your child loses interest in the items available—every three to seven days for a baby or toddler, or as needed. Often, the more items that are on display—especially if they are in big bins and not visible or easily accessible— the less your child will play. Include toys that are primarily open-ended rather than battery-operated with flashing lights and lots of buttons. Open-ended toys are toys that inspire creativity and learning and can be used in multiple ways, often throughout childhood, reducing the need to replace toys and buy new items. Some examples include blocks, animal figurines, dolls, toy food, balls, scarves and bowls.
ENCOURAGE INDEPENDENCE
Playing with your child is beneficial—children model behaviour and need face-to-face interaction with others. There is no magic amount of time that you must play with your child, but dedicating at least ten minutes of attentive play per day is a great start. You can also begin encouraging independent play and modelling focus from babyhood.
Babies and toddlers typically have an attention span of two to five minutes for one task—though it may seem like your child is moving on quickly, •
doing so is developmentally normal. Model focus for your child by paying attention when playing with them and sticking to the task at hand. Try to follow your child’s cues and encourage them to take the lead. It is okay to help them, but sit back and observe periodically to give your child time to learn and react.
Help your child work up to longer spans of independent play by slowly increasing the amount of time you are not directly involved in their play, or moving farther away each day for a few minutes while they play on their own.
PROMOTE STRENGTH AND MOVEMENT
Movement fosters learning, and when babies and toddlers are able to explore the world around them, they understand and retain more information. Floor time is the foundation of movement for babies, and time playing on their tummies, backs and sides
leads to strength and, eventually, mobility. From the very beginning, you can focus on placing your newborn on the floor to play, rather than in a bouncy chair or other restrictive container.
Tummy time is essential for strengthening your baby’s neck, shoulders, arms and core, as well as preventing flat spots on their head. Aim for a few minutes at a time, a few times a day, and work up to longer periods as they become stronger. For better arm position, tuck your baby’s elbows in and ensure they are completely underneath baby’s shoulders. You can also fit tummy time into your day by laying your baby’s tummy down on your chest, across or on your legs or even cradled in your arms tummy down.
GET CREATIVE
Play doesn’t need to be complicated or expensive, and less is often more for baby and toddler play. Instead of buying new toys, turn to your recycling bin as a treasure trove for activities and crafts. The following items are great things to save:
- Cardboard boxes
- Shoeboxes
- Cereal boxes
- Plastic lids
- Paper towel tubes
- Toilet paper tubes
- Ice pop or craft sticks
- Plastic bottles
- Cake or pie tins
- Single socks
- Egg boxes
- Broken crayons
- Baby food pouches and lids
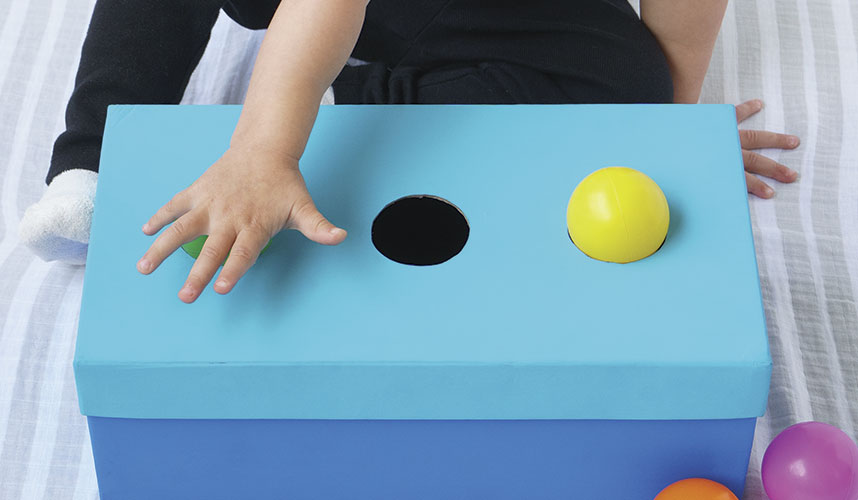
POUND-A-BALL
Create a musical pounding toy that can be used to encourage your child to develop fine and gross motor skills. Pushing or pounding the balls into the box takes hand strength and dexterity, and placing the box in various locations can help your child develop pre-walking skills. Try putting the box on a slightly elevated surface, like a low table or upside-down storage box. Place the balls on the floor in front of the box, then encourage your child to squat down, grab a ball, stand up and push the ball into the pound-a-ball toy. Squatting and standing are important precursors to cruising and walking. Use this toy on the floor as well, or add a colour-matching component by painting different colours around the rims of the holes.
WHAT YOU NEED
- Cardboard shoebox
- Paintbrush and
- acrylic paint
- Pencil
- 3 small balls (such
- as tennis balls, dryer
- balls or ball-pit balls)
- Precision crafting knife
- Pushpin
- Ruler
- Scissors
- String
- 2 pony beads
- 3 small bells
WHAT TO DO
- Paint the shoebox with the acrylic paint, letting the paint dry between coats and using multiple coats to cover the box.
- With a pencil, lightly trace around one of the balls 3 times on the underside of the shoebox lid. If you find tracing the ball difficult, trace a cup that the ball fits just inside of.
- The traced holes will need to be the same diameter as the balls in order for your child to push the balls into the shoebox rather than dropping them into the box. Cut the circles out of the box with a precision crafting knife, first cutting them slightly smaller than the diameter you have drawn and testing the fit. Continue to cut the holes slightly larger until the balls can be pushed through.
- With the pencil, mark the middle of the shoebox’s short sides 3 cm up from the bottom of the box. Use a pushpin or other sharp object to poke through the mark on the shoebox, then widen the holes so that the string can be threaded through the holes.
- Using a ruler and scissors, measure and cut a piece of string that is longer than the shoebox—roughly 45 cm long.
- Thread the string through one hole, and then tie and securely knot a pony bead on the end outside the box.
- Thread the bells onto the string inside the box. Pull the other end of the string through the opposite hole and pull the string taut. Holding the string taut, tie a pony bead on the end of the string outside of the shoebox.
- Replace the shoebox’s lid and push the bells to line up with the holes. Baby can push the balls through with their hands or with a toy hammer. If you don’t have a toy hammer, use a mixing spoon, silicone spatula or upside-down measuring cup.
READ: Play and Learn Activities for Babies: 65 Ways to Promote Growth and Development from Birth to Two Years Old by Hannah Fathi (published by Page Street Kids this autumn)
This article can be found in issue 103 of The Green Parent magazine