By The Green Parent
18th November 2021
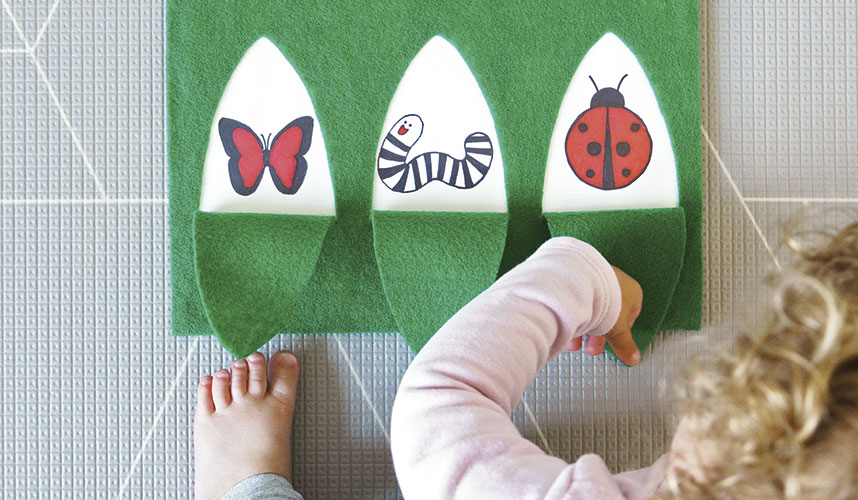
This board will fascinate your child, introducing object permanence and promoting both fine and gross motor skills. Place the board in front of baby during tummy time or while they are sitting, and let them reach for and grab the flaps. Or help baby by opening the flaps to reveal the images if your child is not yet able to grasp. Infants will love the black, white and red shapes, and older babies and toddlers will enjoy hiding and finding each picture. Create different images to switch it up, or let your toddler help you draw the images to hide.
WHAT YOU NEED
- Pencil
- White computer paper
- Scissors
- Black permanent marker
- 23 x 30–cm sheet
- of soft green felt
- 21 x 28–cm sheet of white
- cardstock, plus more if desired
- Red permanent marker
- Cardboard
- 1 clear plastic sheet protector
- for 21 x 28–cm paper
- Hot glue gun and glue
WHAT TO DO
- Using the pencil, draw a leaf and insects, as pictured, onto the white paper and cut them out with scissors. Using the black permanent marker, lightly trace the left and right sides of the leaf cutout onto the centre of the felt to make the middle leaf. Trace a leaf on each side of the middle leaf, with roughly 2 cm of space between the leaves.
- With the scissors, cut a slit at the bottom of each leaf to start cutting the sides of the leaves. Cut the leaves’ sides, but keep the bases intact to form flaps.
- Put the sheet of cardstock under the felt sheet, and use the pencil to trace the 3 leaf outlines onto the cardstock.
- Within the outlines of each leaf, on the cardstock, trace 1 of the insect cutouts. Colour the insects and draw any desired details with black and red permanent markers. If desired, trace the leaves onto additional sheets of cardstock and draw your own images; or print images, cut them out and glue them within the leaf outlines.
- Trace the felt sheet onto cardboard and cut out the rectangle. Cut the binder holes off of the sheet protector. With the hot glue gun on low heat, apply hot glue around the edge of the sheet protector, then adhere it to the cardboard sheet, making sure that the sheet protector’s opening faces the right-hand side of the cardboard.
- Put the decorated cardstock in the sheet protector. Apply hot glue to the side of the felt that will be adhered to the sheet protector, but do not add glue to the backs of the leaves. Carefully press the felt, glued side down, over the sheet protector and align the leaves with the drawings on the cardstock. Ensure that the opening to the sheet protector remains open.
- Add hot glue where necessary to ensure the felt stays in place. Your child can lift and close the flaps to cover and reveal each drawing, or you can prop the board in front of baby during tummy time with the images visible. If you want, you can switch out the cardstock so your child can reveal new drawings.
READ: Play and Learn Activities for Babies: 65 Ways to Promote Growth and Development from Birth to Two Years Old by Hannah Fathi (published by Page Street Kids this autumn)
This article can be found in issue 103 of The Green Parent magazine.