By The Green Parent
17th May 2022
Lately, I’ve found comfort in nurturing. Comfort and nurture. They clearly go together but it wasn’t until recently I identified how much nurturing and providing for another being brings me comfort. Maybe it’s just a moment of control. An assurance of capability. But I’ve been collecting lives around the little cabin I live in, to love and nurture for the internal peace they provide me. My greatest realization in the experience of our lives today is that there is so much potential in regrowth. I say this literally referring to vegetation, but am hopeful and optimistic it is true for us, our society, our economy, as well. Here’s to regrowth (and awkward vegetable-philosophical metaphors)!
There is so much more life in our hands (and refrigerators) than we may have chosen to see. Through reasons of curiosity and a stretch at self preservation, I have experimented with recycling my ordinary supermarket produce, and the results I’ve received so far are enlightening. Although we consider them as one-time use, much of our produce is still living. And that pretty head of lettuce still has so much life, and potential. Given a little nurturing, it is capable of regrowth and very likely capable of returning the nurturing favour in time.
I encourage you to give it a try with your own produce. Whether in hope to maintain a direct food source or just as a fun activity with your family (or a multipurpose approach to house plants). I’ve collected my best practices and advice for doing so here.
And with this I share my adopted mantra for this season of life, Grow Through what you Go Through.
WHAT YOU NEED
Supplies required to regrow produce is very minimal.
- Sharp knife and cutting board
- A drinking glass, bowl, or dish appropriate for the size of the plant
- Something that will help it stay upright
- Sunlight and water
- Potting soil and pot/planter
WHAT TO DO
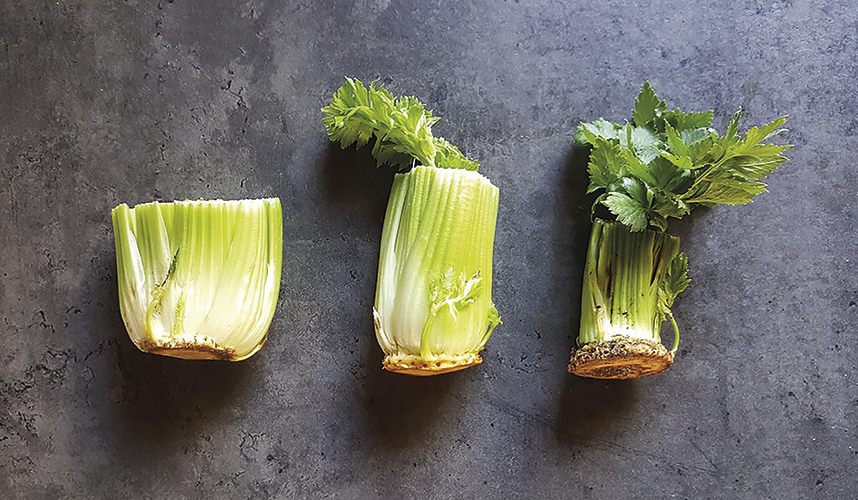
- The first step of this process is to enjoy your produce. Using a sharp knife and cutting board, cut the leaves or stem you plan to consume away from the base of the plant. I like to leave 5 cm of the base of the plant existing so that it has ample support to stay upright while growing. *I have had the most success with heads of lettuce, spinach, green onions, celery, and pineapple. If the plant item still has a root system (such as “living” lettuce or green onions) it will grow more quickly, but I have found roots can be reestablished if they were removed before. Try to purchase items that look most like their original state - right before they were plucked from the farm. (The less plastic accompanied with it, the better)
- Remove some of the outer layers of leaves from the heart (the more tender, small interior leaves) of the plant. You don’t need to uncover the heart, but this helps to expose existing roots and in my opinion stimulate the plant for regrowth (that is not a scientific statement. I am only speaking from my own experience. And I’m the type of person who talks to my plants, so…)
- Place the plant base in your designated dish or bowl. For example, I like a low rimmed bowl for lettuce and a tall glass for green onions. Match the dish for the anticipated growth of the plant.
- Fill the dish with about an inch of clean water. If the plant still has a root system established, fill with just enough water to cover the roots.
- Place in a sunny window for 2-5 days, replacing the water and rinsing the base of the plant with clean water at least once a day to prevent unwanted decay. If the outer leaves do rot, simply remove them, discard, and freshen the water. No big deal.
- By the second or third day, you should start to see regrowth from the top of the plant. Examine the base of the plant for signs of roots and any growth. If there are roots, proceed to step 7. If not, revisit step 5. I’ve found my plants don’t always re-establish roots until they are planted in soil again and sometimes they don’t at all, but you will likely still have regrowth from the top of the plant that can be consumed or just visually enjoyed. You grew that!
- Once roots are re-established, or after the plant has grown in the window for up to two weeks, I recommend transferring the plant to soil. A standard potting soil from a garden centre is what I use to fill a pot or planter. Dig a hole approximately an inch deep and place the plant inside, packing the soil around it. If it does have roots, be sure your hole is deep enough for them to be placed in without overcrowding or significant damage to the roots. Place in a sunny spot outside and water often to keep the soil damp.
- After significant growth (or up until the point you just can’t wait any longer), cut the leaves or stems away from the base of the plant without removing it from the soil. Enjoy your harvest and continue to tend to your plants with the hope of regrowth, again.
Sonia Bainum is mama to one and a lover of all things domestic. She spends much of her time in the family’s tiny cabin kitchen, creating recipes and finding any reason for a sweet treat. Read her blog at bainumlane.com.