By The Green Parent
20th October 2020
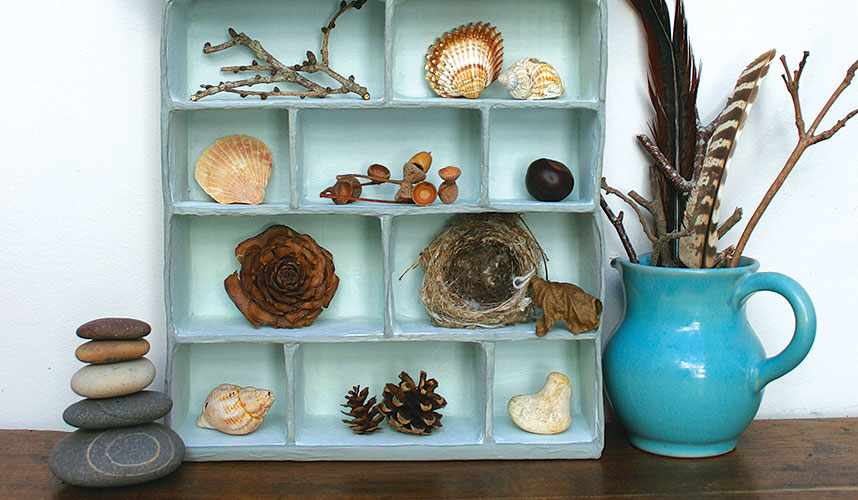
Carve up an old cardboard box and add a little papier mache to create your own custom storage. These shelves are ideal for displaying small nature finds but would also be perfect for small car collections or other tiny toys.
SUPPLIES: Cardboard box lid with sides or a box cut down to a shallow depth, spare cardboard, newspaper, masking tape, glue, craft knife, ruler, cutting mat or scrap cardboard to cut on, pencil, paint, paintbrush, four food tins
OPTIONAL: paperclips, string
Papier mache paste: flour, water, whisk, and small saucepan
1 Measure the inside depth of your box and the inside width to determine the size of your shelves.
Use your measurement to mark out shelves on a spare piece of cardboard and cut them out. If you make the shelves fit snugly then it’s easy to move them around and play with the arrangement of them.
TIP: When using a craft knife on card or cardboard, keep the blade straight up and down perpendicular to your ruler and make several cuts; do not try and push the knife through in one or two cuts or the cardboard and fingers may get damaged. Always use sharp blades; dull blades will tear instead of cut.
2 Using the same measurement for the depth of the shelves cut out some dividers and place them perpendicularly between layers of shelves creating cubby-holes. Move them all around until you have the sizing you like. No need for careful measuring or a spirit level here, simply eyeball it then stand back a few steps to see if the placement looks straight enough.
3 Use masking tape to tack the shelves in place, if the spacing > looks wonky then adjust them at this stage. Next tape the shelves and dividers securely enough so that they won’t move when the papier mache layers go on or just tack them down with the tape then glue them into place and let the glue dry before moving on to the next step.
4 To turn the shelves into more of a decorative piece, create a simple cornice for the top. We used the curved lip of a box flap cut in two then sliced the two ends at an angle and taped the angled ends together.
5 A simple scalloped edge would also work well and can easily be made by tracing half way around a 10p coin on the edge of a strip of cardboard and trimming it out.
6 Make the paste. To make a smooth paste, whisk one part flour into one part warm water. When the mixture is very smooth, pour it into four more parts warm water in a saucepan. Then heat the mixture until it gently boils and thickens, whisking all the time. Leave the paste to cool down. When it’s cool enough to use if there are any lumps or if a skin has formed on the top of the paste, pass the mixture through a sieve.
Place your assembled shelves on four food tins to help keep the shelves from sticking to the surface of the table. Tear or cut strips or squares of newspaper. Coat a strip of paper in the paste and squeegee it between two fingers to get excess paste off. Lay the strip over the box. Continue gluing strips all over being sure to gently push the strips into edges and corners so that they lay flat.
7 When putting the pasted strips over the cross sections of shelving it’s helpful to trim little notches in the corner areas to help smooth the paper down. Cover the entire thing in one layer of papier mache and leave to dry. Remember to cover your cornice piece in papier mache too. Using narrow strips of newspaper for papier mache helps to smooth over curved areas more easily.
When the papier mache is dry, glue the cornice piece to the top of your display shelves and leave it to dry.
Paint the shelves in one or multiple colours. To display our nature finds we chose neutral colours so that the treasures really stand out. Toys might look best against bright colours.
8 The shelves can stand on a table or hang on a wall. To hang them, open a paperclip part way and poke the end up through the outer edge of the box near the top. Do the same on the opposite side then tie a string to each side of the paperclips. Be sure not to stack heavy objects on the shelves if they are to hang on the wall as the paper clips may unbend and collapse over time.