
By The Green Parent
24th March 2020
People throughout the ages, across lands and cultures are no strangers to making the most out of what they have. One of my very favourite picture books from childhood was The Boy Who Ate Flowers. If you haven’t read this 1960s classic by Nancy Sherman, the title pretty much sums it up. Peter, the boy, begins to tire of eating oatmeal and he goes in search of new culinary experiences… in his mother’s flower garden. Unfazed that everyone thinks that Peter has lost his mind, I delighted in the fact that Peter had found a tasty underappreciated food source – made even better with the eventual help of a French flower chef. Fast forward a couple of decades and I was living in Japan, learning to cook vegetables I’d never seen or heard of before that showed up in our farm box. I was also introduced to two important concepts: mottainai and hara hachi bu, both of which deeply resonated with me. Mottainai is a word that expresses regret regarding wastefulness. In some ways it’s not all that different from the English expression, “Waste not, want not,” but to me it manages to somehow not only capture the shame of wasting a precious resource, but also hold onto the gratitude for what a gift (food, time, money, etc) it was in the first place. Hara hachi bu, an important part of the traditional Okinawan approach to eating, is a phrase that means “eat until you are 80% full.” In theory that’s pretty self-explanatory: in practice I think of it as eating just enough to no longer feel hungry. It’s that point where you could keep eating, but maybe don’t need to – this way you’re not overindulging and you’re giving your brain time to fully process whether you’re full before you overdo it. I love a good challenge, I hate to see unnecessary waste and I believe it’s important to be conscious of our consumption – of food and beyond. These characteristics set the stage for my love of cooking with scraps. Find one of my favourite recipes on the next page - making your own quick pickles with things maybe originally destined for the compost bin.
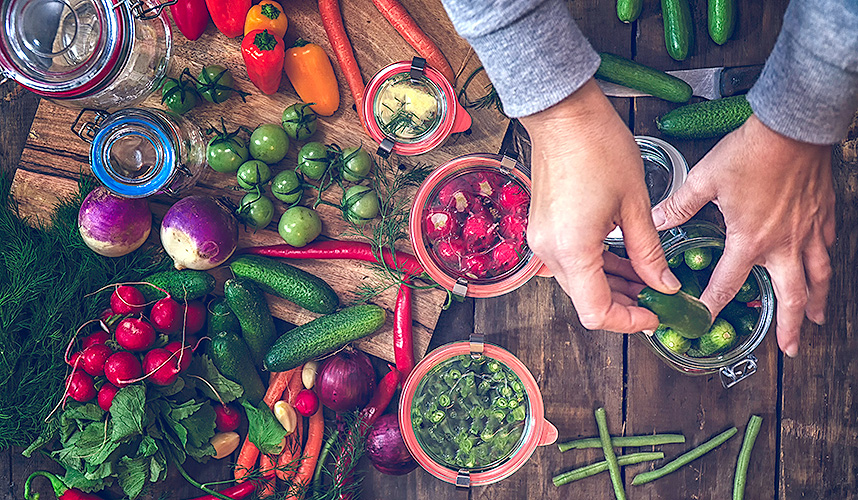
QUICK PICKLES Making a batch of quick pickles is a good way not only to use up any scraps and stragglers in the produce bin of your refrigerator, but also to revive the ones that are starting to go limp (I’m looking at you, carrots and celery). Kosher salt (or pickling salt) is ideal, because it won’t make your brine cloudy like table salt can. Some cooks advise against using sea salt due to the trace minerals in it. I’ve never had an issue using sea salt in quick pickles, but I stick with kosher when I have it. Although any type of vinegar will work, I always use a light-coloured variety, so the colour of the pickle isn’t impacted. Good options include apple cider vinegar, white wine or champagne vinegar, or rice vinegar. White distilled vinegar will work as well, but it does have a harsher flavour. What should you pickle? Almost anything that sounds good to you. Green beans, asparagus, aubergine, peppers, peas, beets, carrots, radishes, cucumbers, celery - you get the idea. And don’t stop at vegetables, try fruits as well, such as grapes, apple slices, berries, and of course scraps—like the white part of watermelon rinds, cucumber ends and peels, and chard stalks. I tend to use wide-mouth jars (it’s easier to get the items back out). I like to start with small batches, one or two jars at a time for multiple reasons: I like variety and don’t want too much of any one pickle; it’s easier to motivate yourself if you’re not staring down a countertop full of jars; and, especially when you’re pickling scraps, there probably isn’t all that much of any one thing to pickle anyway. I don’t have a standard rule for how much brine to make for how many jars, because it will vary depending on what I’m putting in them (for instance, there will be more gaps around unripe cherry tomatoes than there will be for sliced kale stems)—I just make an educated guess. If you don’t have quite enough to cover your pickles, add a bit more water; it will be fine. If that imprecision bugs you, Fred R. once shared a clever tip on Food52: Pack your jars with the items to be pickled, fill the jars with water, then empty the water into a measuring cup—that’s how much brine you’ll need.
TANGY FRIDGE PICKLES
• Items to be pickled
• Spices and/or herbs (optional)
• Vinegar
• Kosher salt (or pickling salt)
• Granulated sugar (optional)
1. Pack your jars. Place your items to be pickled in a jar (or similar glass container) that has a lid or cover and add flavour with herbs and spices and other aromatics, things like mustard seeds, red pepper flakes, a crushed garlic clove, a knob of fresh ginger, citrus zest, fresh dill. Think about what you’d like your final result to be and play around with different combinations.
2. Make the brine. There’s no hard and fast rule with quick pickle ingredient ratios, but just like I prefer my vinaigrette on the tangy side, so too do I like my pickles. I use a 3:1 ratio of vinegar to water and add 1 tablespoon salt for every (total) cup of liquid. There’s your basic brine. If you’d prefer a pickle with less of a bite, use a 2:1 ratio of vinegar to water and add sugar—I generally don’t add much, if any, but if you’d like to, you can add up to as much sugar as water.
3. I often just shake the brine in a jar to dissolve the salt, but you can also heat the brine in a pot on the stove to save time - go with this option if you’re using more than a tablespoon or two of sugar.
4. Pour in the brine. Cover and refrigerate the brine-covered item for at least an hour or two, ideally longer to let it really pickle. They’ll keep this way for a few weeks.
You don’t always need to make a big production of pickling! If you ever have a small amount of something, like extra chopped shallots or onions, simply place them in a jar, add a pinch of sugar and a pinch of salt, cover with vinegar, and toss them in the fridge. They’re a handy condiment to have on hand to liven up anything from salads and sandwiches to rice bowls and more.
MORE INSPIRATION
FIND Lindsay @ lindsayjeanhard
READ Cooking with Scraps: Turn Your Peels, Cores, Rinds and Stems into Delicious Meals (Workman Publishing)
EXPLORE More recipes at food52.com/tags/cooking-with-scraps